# Set Up Guide
{% stepper %}
{% step %}
**Download the CrossTrade Add-On**
Install and connect to CrossTrade
{% endstep %}
{% step %}
#### Create an alert on TradingView
Add your webhook URL and alert message
{% endstep %}
{% step %}
#### Review Alert History
Visit crosstrade.io/user/alert-history to review your alerts
{% endstep %}
{% endstepper %}
{% hint style="success" %}
**This video tutorial will walk you through the steps outlined on this page. We recommend reviewing both to ensure you master the Set Up process.** \
\
**You got this! 😎**
{% endhint %}
{% embed url="" %}
## Step 1 - Download and Install the Add-On
{% embed url="" %}
Click to Download
{% endembed %}
### Install the Add-On
Once downloaded, open NinjaTrader and install the Add-on by clicking on Tools > Import > NinjaScript Add-On.
{% hint style="info" %}
Before you restart NinjaTrader, enable the ATI!
{% endhint %}
### Enable the NinjaTrader ATI
Enable the Automated Trading Interface (ATI) to accept your external commands by going to Tools > Settings > Automated Trading Interface.
{% hint style="success" %}
**Now restart NinjaTrader**
{% endhint %}
### Connect to Live Data
In order for your order execution to be supported you need to connect to a live data feed. This can be a purchased data subscription from NinjaTrader directly or a data feed that is provided through a prop evaluation account.
{% hint style="warning" %}
Level 1 data is sufficient for XT orders - Level 2 data is **not** required.
{% endhint %}
### Log In to CrossTrade
After you have restarted NinjaTrader, it's now time to *Log In* with your email and password.
## Step 2 - Create a TradingView Alert
To set up an alert, you can utilize various trigger conditions and decide whether the alert should fire once or repeatedly until you disable it. You can customize the alert message to include specific information or values that are relevant at the time the alert is triggered. The notifications for these alerts can be received via pop-ups, emails, and even push notifications if you have the TradingView mobile app installed.
Inside your Supercharts, click to open an Alert window from the top or right navigation clock button
### Determine your Alert Conditions
To set up an alert, you can utilize various trigger conditions and decide whether the alert should fire once or repeatedly until you disable it. You can customize the Expiration date of the alert and provide a name to keep your alerts organized.
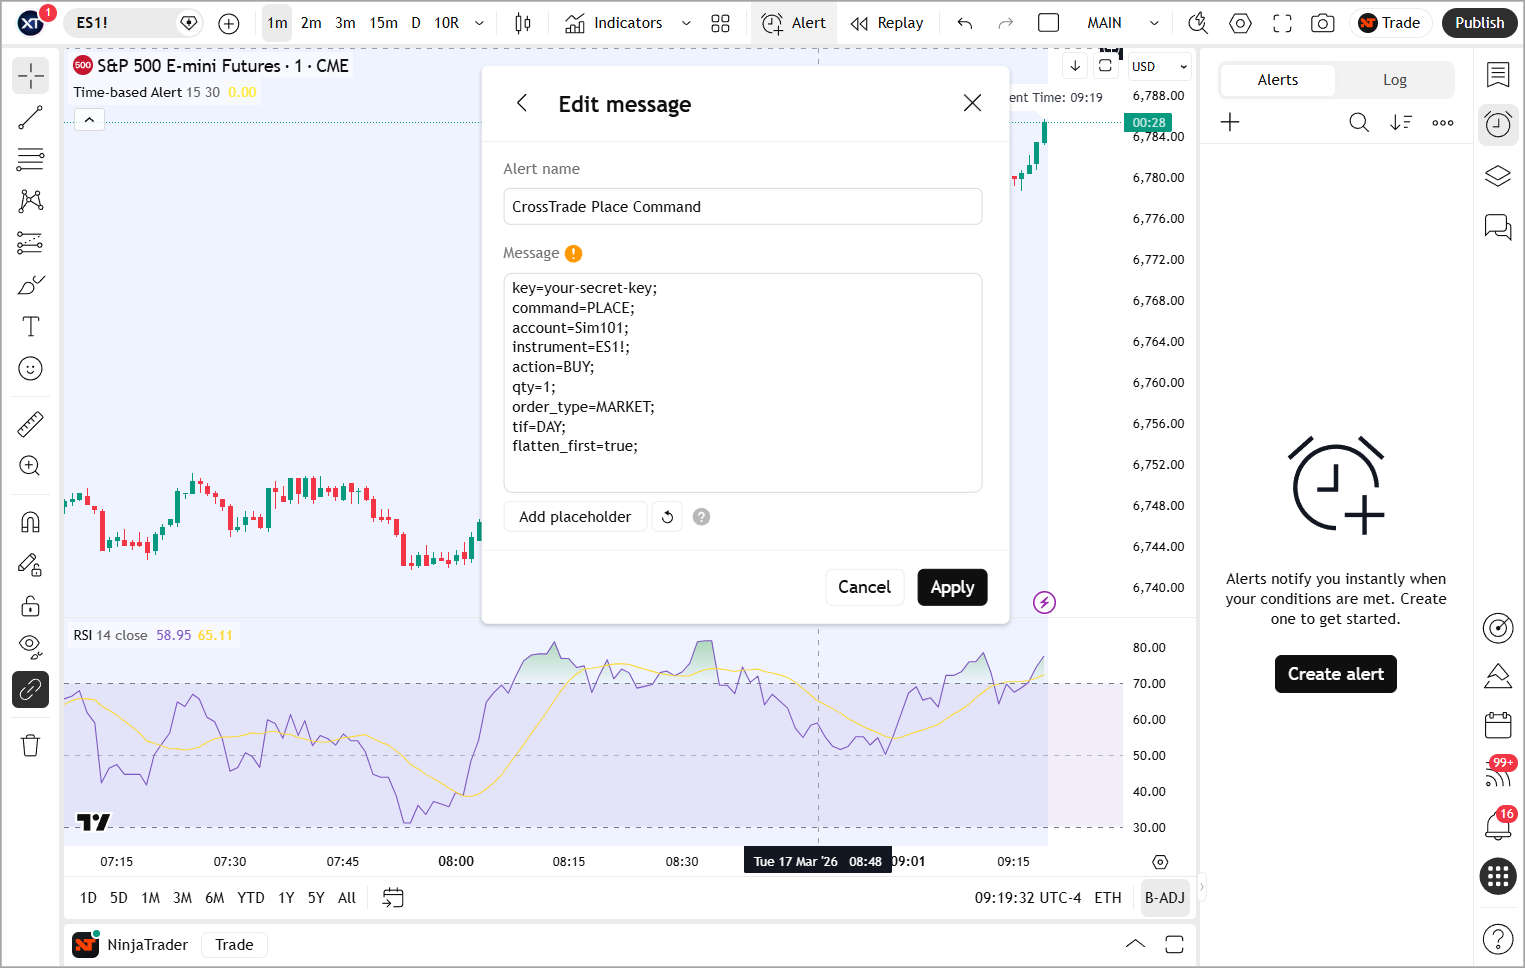
### Provide payload information
In the message field you will supply the payload information you want to send to CrossTrade for relay to NinjaTrader. You can customize this however you want based on the methods NinjaTrader will accept.
{% hint style="warning" %}
**Remove the default text in the Message window!**
ONLY the CrossTrade command can be present. \
\
For example: Bot V3 (, , , , , , , , , , , , , , , , hlc3, 5, 2, 2.8, 3, 3, 5, 5, 5, 5, NORMAL, 0.75, 0.75, 25, 3, 2, NORMAL, 3, 3, 4, 4, 9, 5, 1, 1.2, 59, 43, 1.55, 23, 2.4, 6.2, CLASSIC, 9, 19, 0.7, 0.25, 0.6, 5, 19, MAC-Z, 6, 67, 25, 17, 2, 0.6, 61, 80, 20, 80, 20, 50, 14, 30, 15, 30, 0.75, 10,000, Small): order {{strategy.order.action}} @ {{strategy.order.contracts}} filled on {{ticker}}. New strategy position is {{strategy.position\_size}}\
\
**All of that needs to be removed.**
{% endhint %}
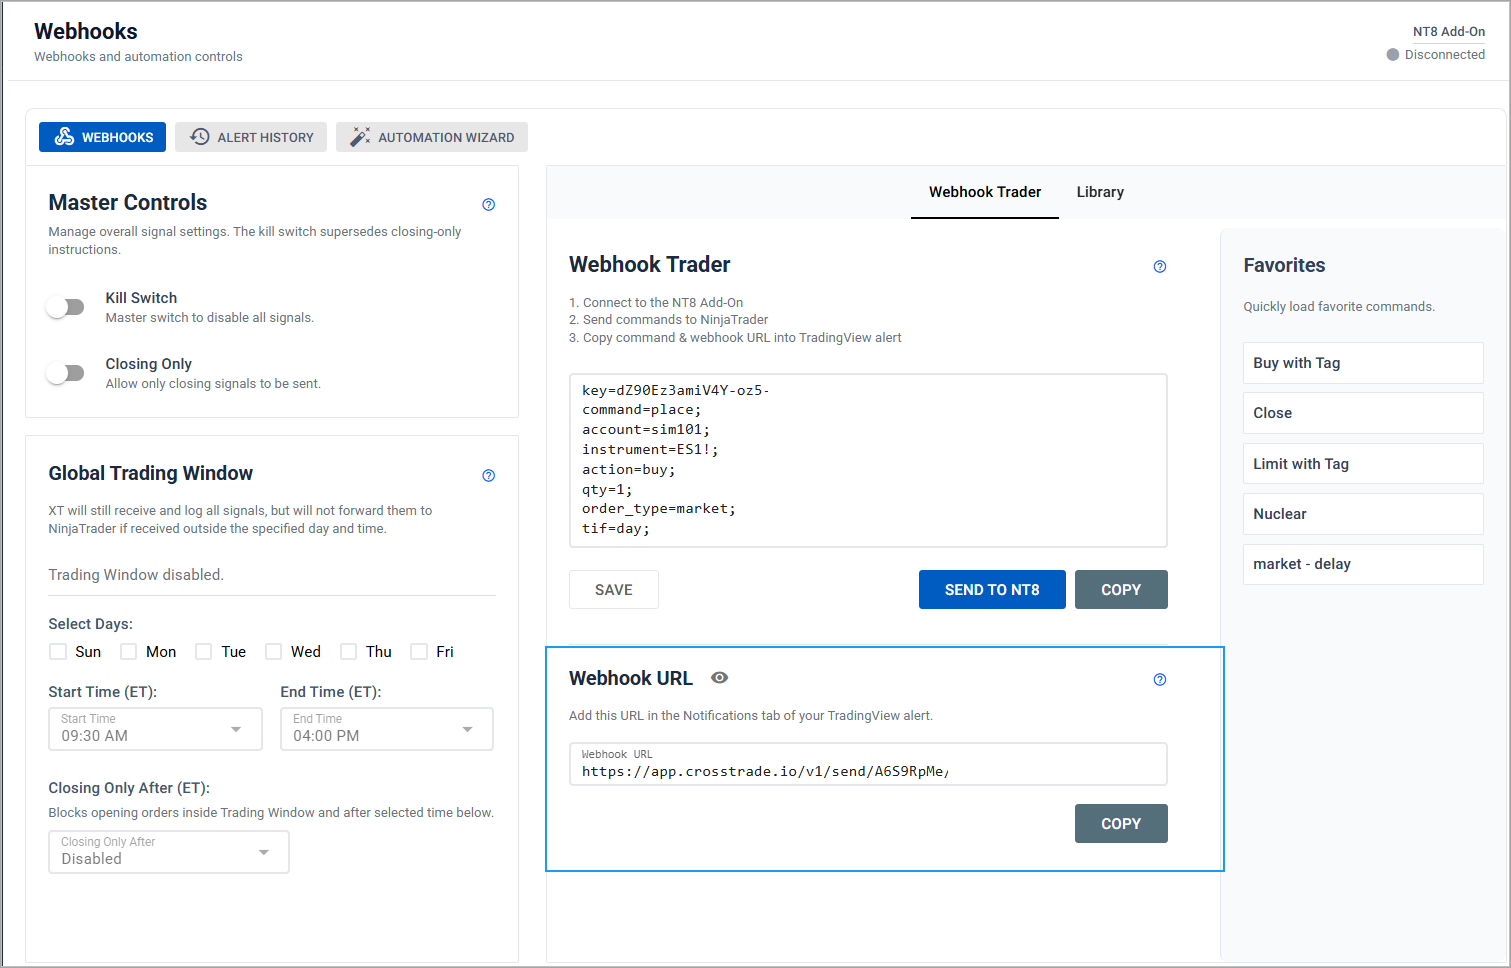
Here is an example of a basic PLACE command for a Buy Market order.
```
key=your-crosstrade-secret-key;
command=place;
account=sim101;
instrument=ES1!;
action=buy;
qty=1;
order_type=market;
tif=day;
```
{% hint style="info" %}
If you are automating a **strategy** use the following command example with the strategy variables:
{% endhint %}
{% hint style="info" %}
This command uses Strategy Sync logic and is designed to allow your TradingView strategy to send both entries and exits without interference. If you intend to have NinjaTrader handle the exit logic, you will need to remove the Sync logic (last 4 lines) and add [trade brackets](https://docs.crosstrade.io/webhooks/advanced-options/bracket-orders) or an [ATM strategy.](https://docs.crosstrade.io/ninjatrader/atm-strategies/creating-atm-template)
{% endhint %}
### Add Webhook URL
Your webhook URL is found on the Dashboard **and/or** your My Account page
Copy the webhook URL from either location to your clipboard...
### **Paste Webhook URL**
On the **Notifications tab** of the alert window, you will need to provide your specific CrossTrade webhook URL. You can also enable alerts for pop-ups, emails, and mobile push notifications if you have the TradingView app installed.
{% hint style="danger" %}
**Webhooks require 2FA to be enabled on your TradingView account. If you have not used webhooks before, you will see this prompt.**
\
\
Once enabled, you can add the webhook URL into the field and save the alert.
{% endhint %}
### Managing Alerts on TradingView
You can edit, clone, or delete them from the alert manager, and even adjust alert conditions directly on the chart for easy visualization. Alerts that have been triggered are logged, and you can access and review this log to track past market events and alert responses.
{% hint style="warning" %}
Note: TradingView alerts do not dynamically update when you change a condition in your indicator/strategy or chart setting. If you make changes, be sure to update the alert in the Condition dropdown.
{% endhint %}
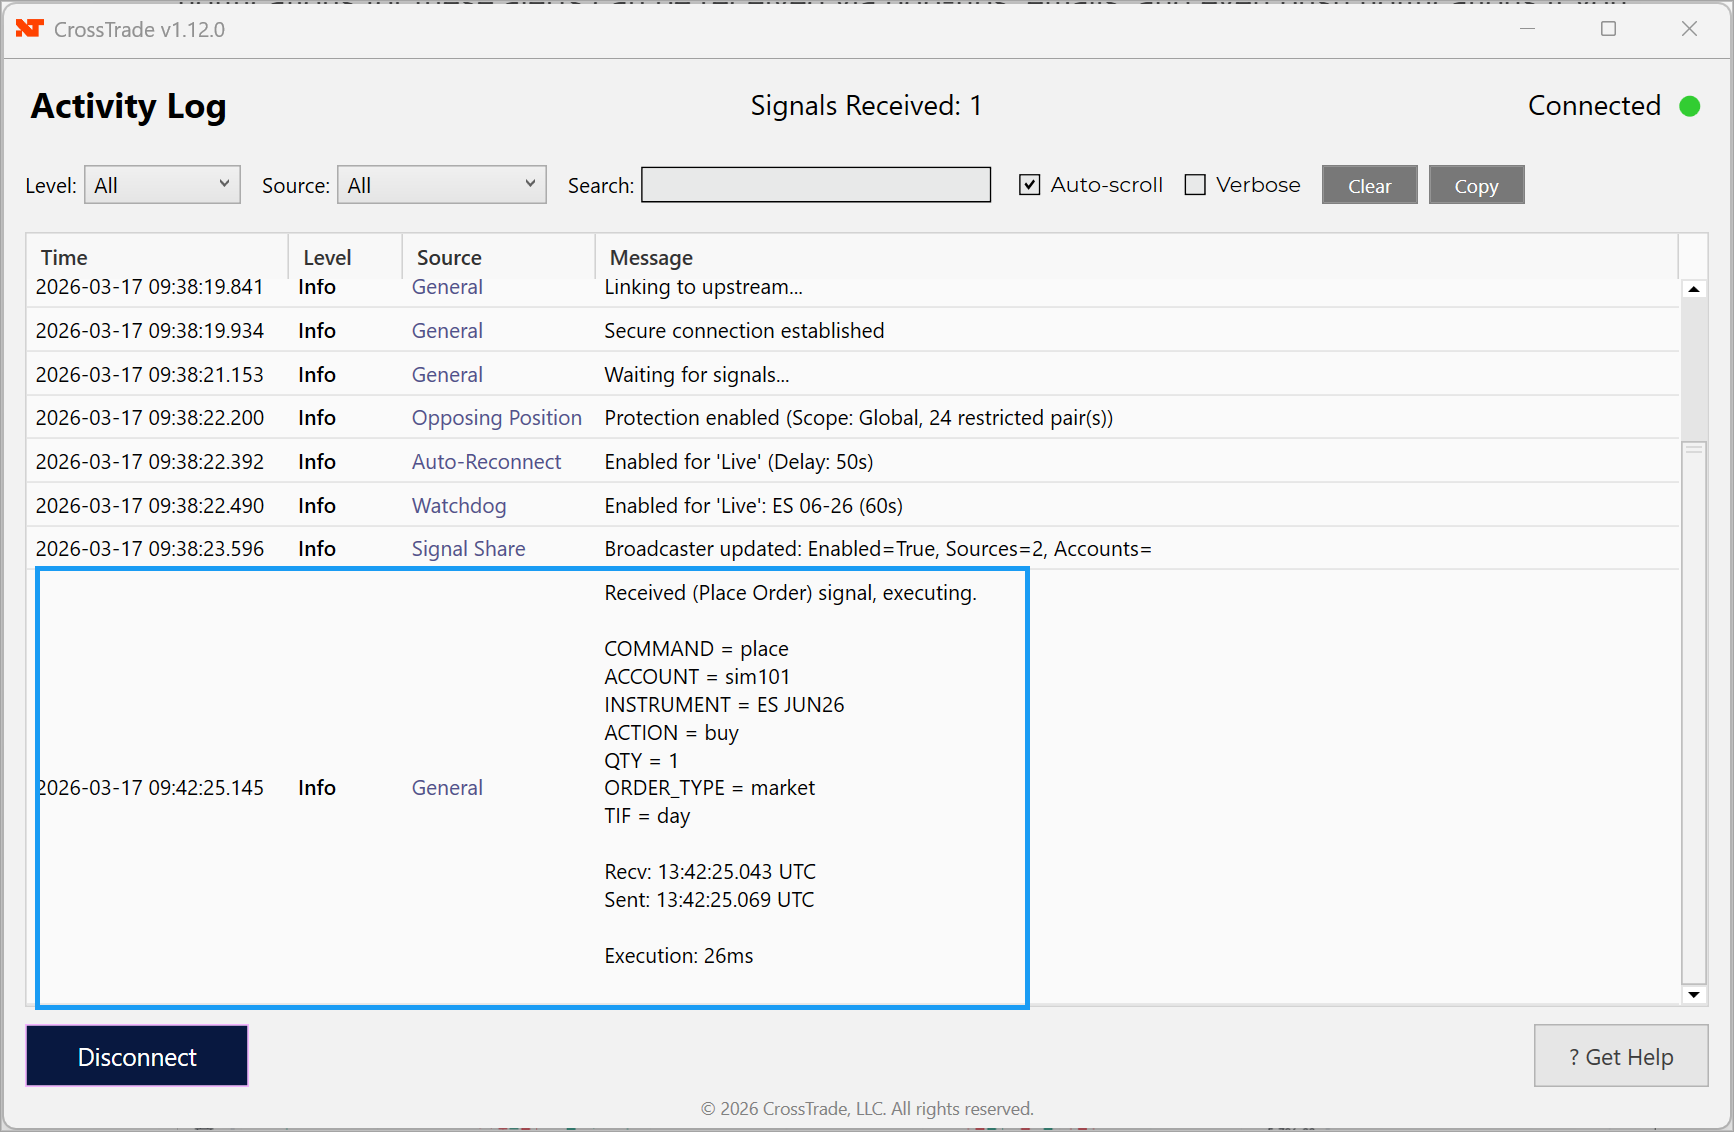
## Step 3 - Reviewing Alerts on CrossTrade.io
Once you start sending alerts from TradingView to CrossTrade and NinjaTrader, you can review your recent alert history on the[ CrossTrade Alert History page](https://crosstrade.io/user/alert-history) in your account.
Additionally, you're XT Add-on also shows every alert received:
{% hint style="success" %}
Great Job! You are on your way to becoming a CrossTrade master.
{% endhint %}


.webp?alt=media&token=514dc1de-303e-40da-b8a7-ceb34fe5e55a) \
\
Once enabled, you can add the webhook URL into the field and save the alert.
{% endhint %}
### Managing Alerts on TradingView
You can edit, clone, or delete them from the alert manager, and even adjust alert conditions directly on the chart for easy visualization. Alerts that have been triggered are logged, and you can access and review this log to track past market events and alert responses.
{% hint style="warning" %}
Note: TradingView alerts do not dynamically update when you change a condition in your indicator/strategy or chart setting. If you make changes, be sure to update the alert in the Condition dropdown.
{% endhint %}
\
\
Once enabled, you can add the webhook URL into the field and save the alert.
{% endhint %}
### Managing Alerts on TradingView
You can edit, clone, or delete them from the alert manager, and even adjust alert conditions directly on the chart for easy visualization. Alerts that have been triggered are logged, and you can access and review this log to track past market events and alert responses.
{% hint style="warning" %}
Note: TradingView alerts do not dynamically update when you change a condition in your indicator/strategy or chart setting. If you make changes, be sure to update the alert in the Condition dropdown.
{% endhint %}